
SETUP
-
Configuring exelaonline to an existing outlook 2016 profile
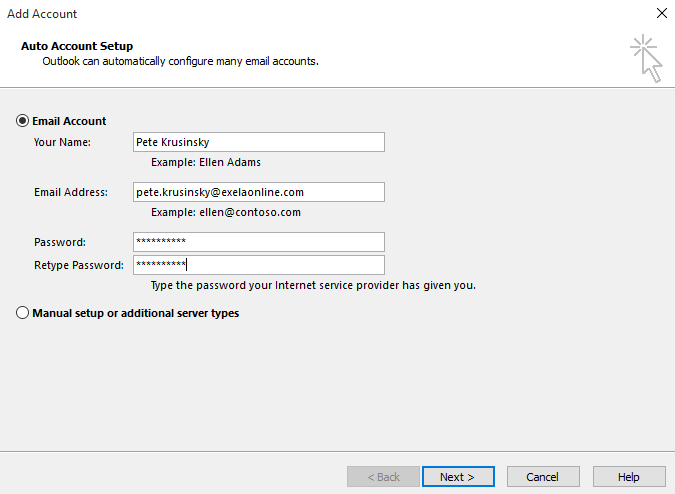
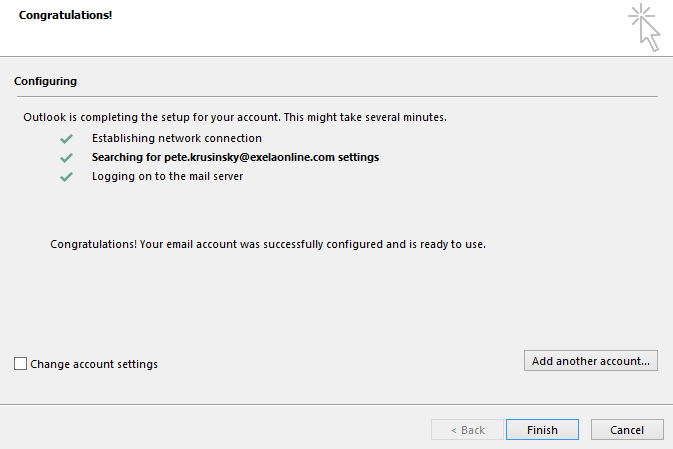
- 1. Open Outlook 2016.
- 2. Select File > Add Account

- 3. Enter your name, email address, and password > then Click Next
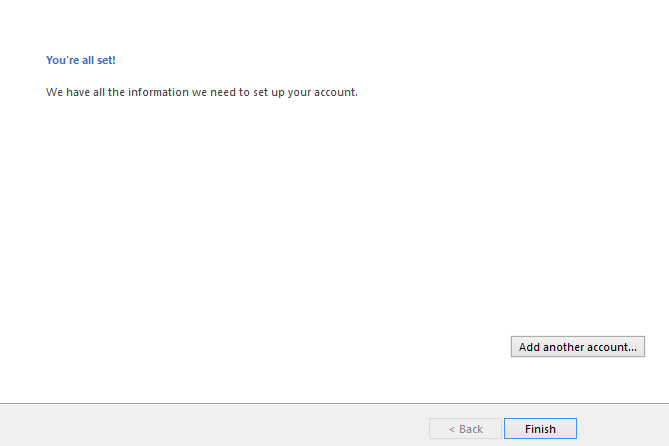
- 4. Select Finish
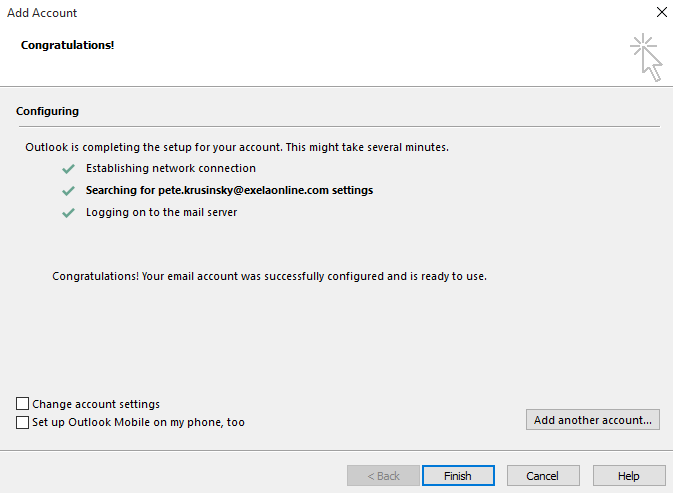
- 5. Select OK > Restart Outlook

- 1. Open Outlook 2016.
-
Configuring exelaonline to an existing outlook 2013 profile
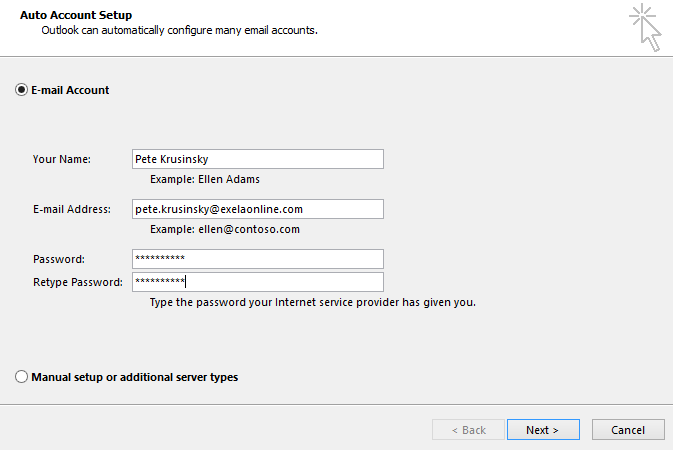
- 1. Open Outlook 2013.

- 2. Select File > Add Account
- 3. Enter your name, email address, and password > then Click Next
- 4. Select Finish
- 5. Select OK > Restart Outlook

- 1. Open Outlook 2013.
-
Configuring exelaonline on outlook 2016 for MAC
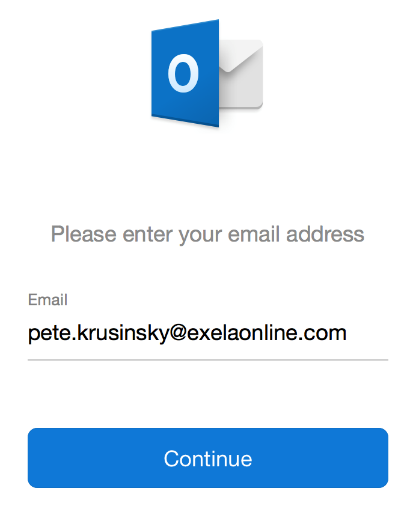
- 1. Open Outlook 2016.

- 2. Select Tools > Accounts...

- 3. Select + > New Account...

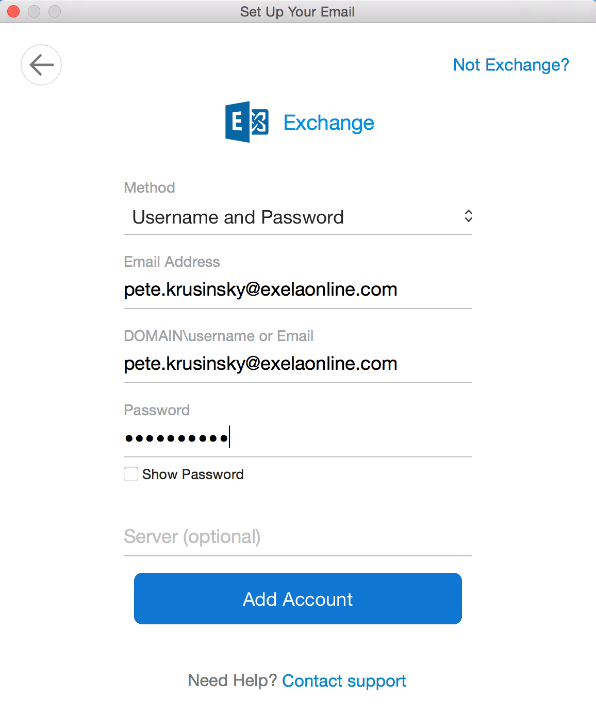
- 4. Enter your email address. Then select Continue
- 5. Enter your email address, your user name, and your password. Then select Add Account
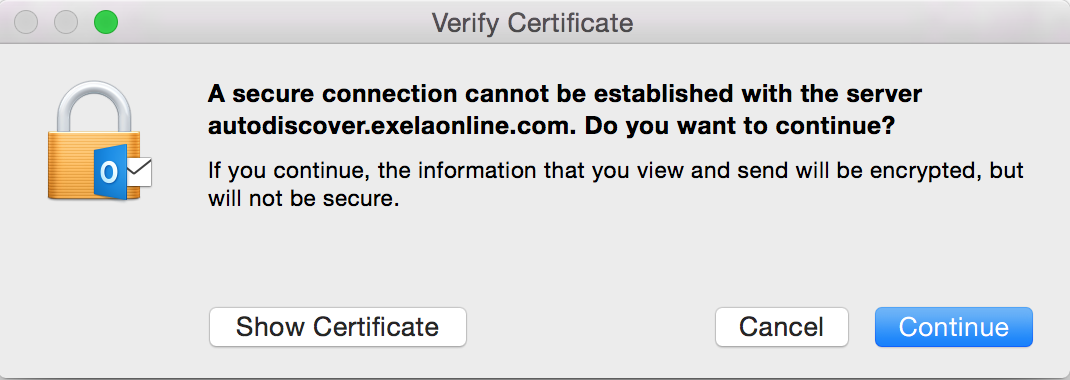
- 6. Select Continue if you see this screen > then Select Done > Close the Accounts screen

- 1. Open Outlook 2016.
-
Configuring exelaonline on outlook 2011 for MAC
- (macOS 10.12 Sierra)
1. Open Outlook 2011.

- 2. Select Tools > Accounts...

- 3. Select + > Exchange...

- 4. Enter your email address, your user name, and your password. Then select Add Account > Close window to start
using Outlook.

- (macOS 10.12 Sierra)
-
Manual setup of exelaonline on outlook 2013
- 1. Open Control Panel
(You may have to change the View By: Small icons)
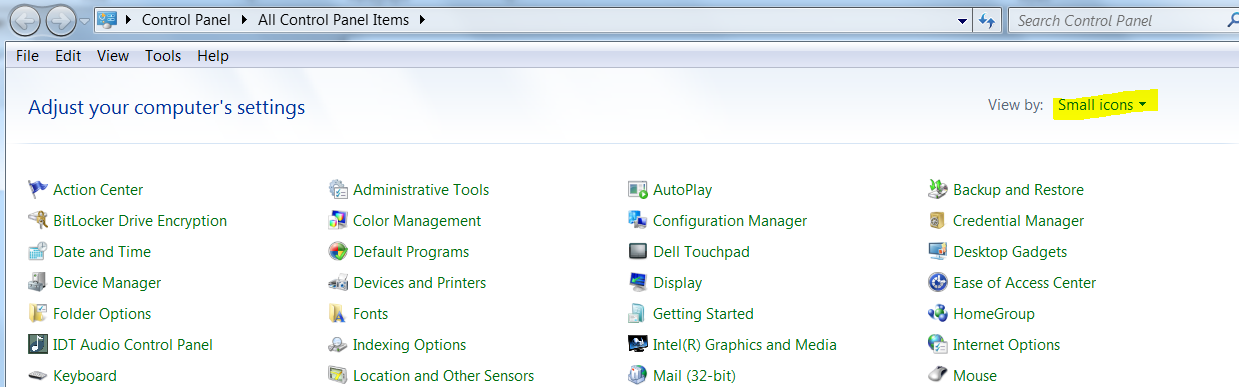
- 2. Double Click Mail (32-bit)

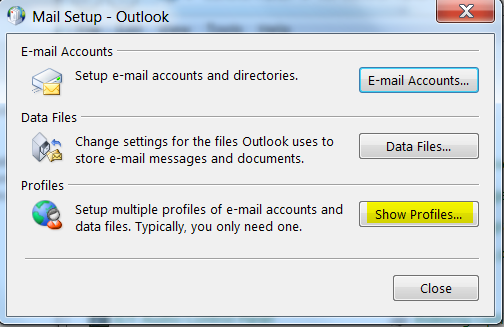
- 3. Click Show Profiles
- 4. Click Add...
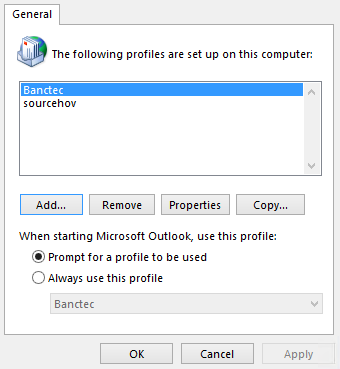
- 5. Type a Profile Name: and Click Ok

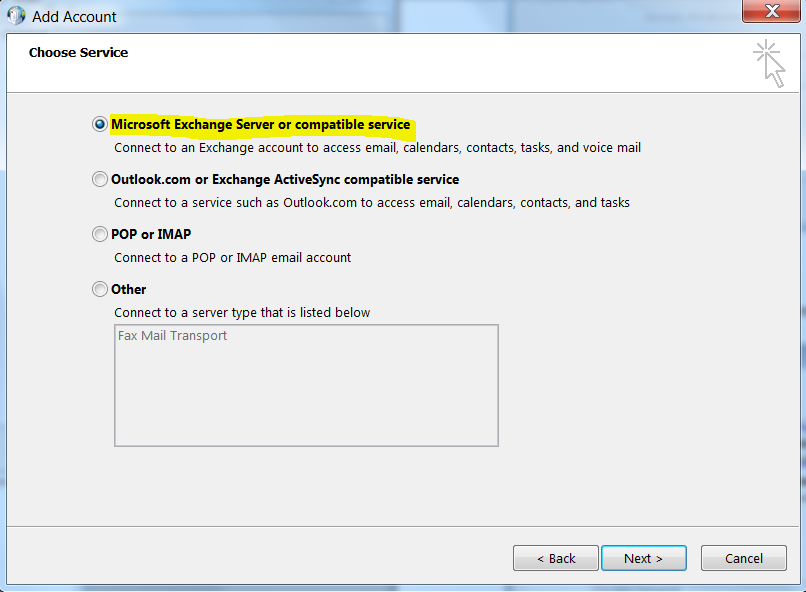
- 6. Select Manual setup or additional server types and Click Next

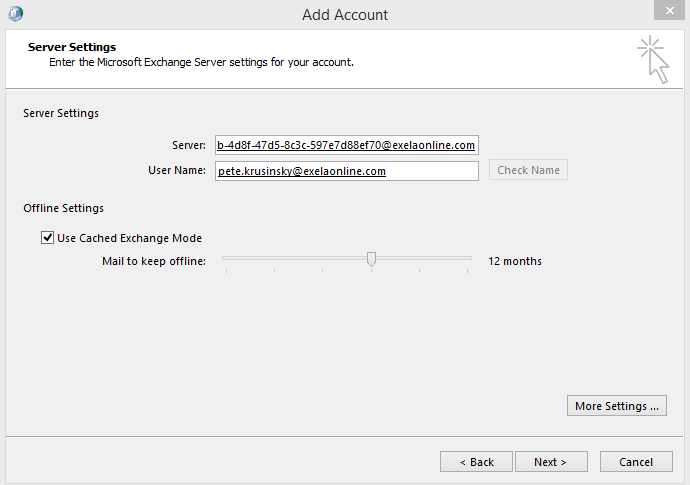
- 7. Select Microsoft Exchange Server or compatible service > then Click Next
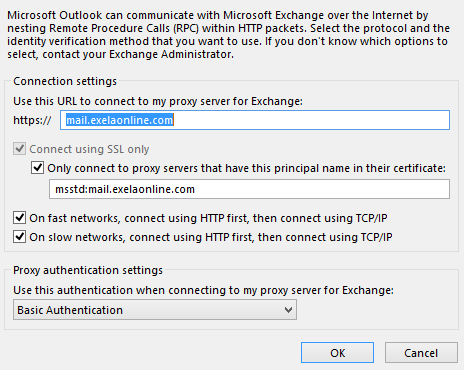
- 8. Enter try-xmail.ex01a.exelaonline.com in Server Field
Enter your user name firstname.lastname > Click More Settings...

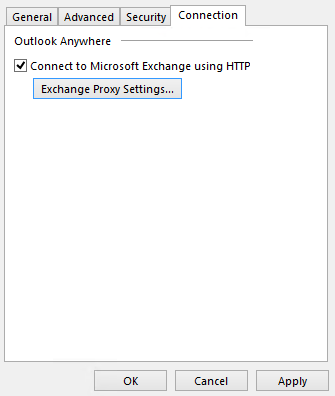
- 9. Click Connection tab
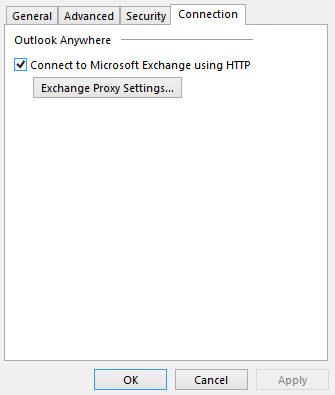
- 10. Check Connect to Microsoft Exchange using HPPT > then Click Exchange Proxy Settings
Enter the information exactly as it is below > then Click OK
- 11. Click OK
- 12. Click Check Name

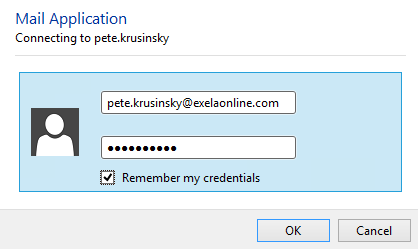
- 13. Enter your email address and password on the pop-up screen. Check Remember my credentials > then Click OK
- 14. If everything was entered correctly your name will be underlined. Click Next
- 15. Click Finish
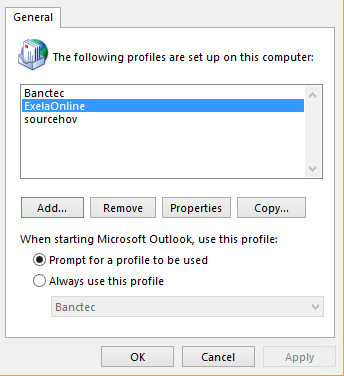
- 16. You can have Outlook prompt you for which profile to use or choose the one you want to come up all the time.
Click OK
- 17. Open Outlook
- 1. Open Control Panel
PASSWORD
-
exelaonline password change through webmail (OWA)
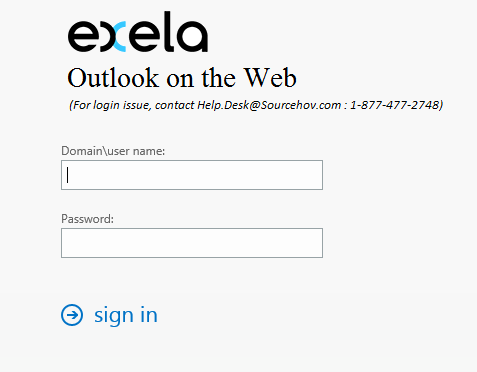
- 1. Login to https://mail.exelaonline.com/owa
Enter Exelaonline\firstname.lastname
Your Password
Click sign in > (enter your time zone the first time you login)
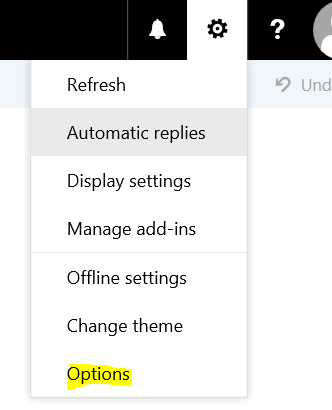
- 2. Click the Gear Wheel icon > then Click Options
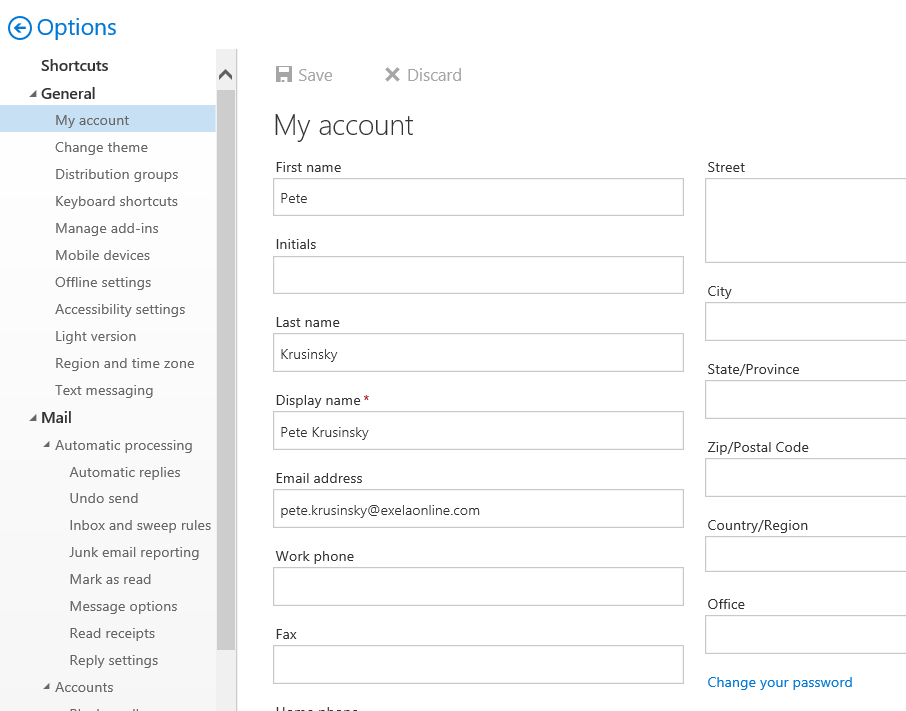
- 3. Click General > then Click My account > then Click Change your password
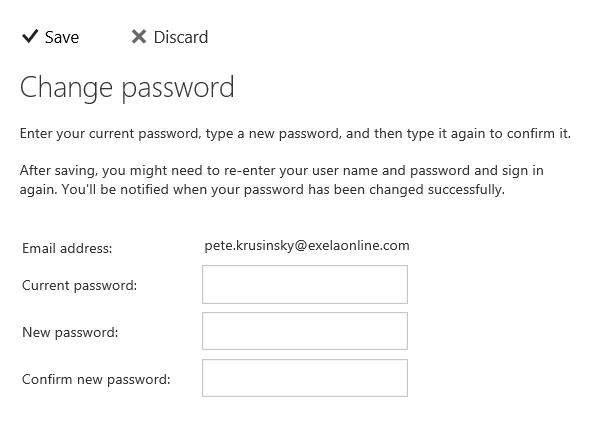
- 4. Enter your Current Password then your New Password > then select Save
- 1. Login to https://mail.exelaonline.com/owa
-
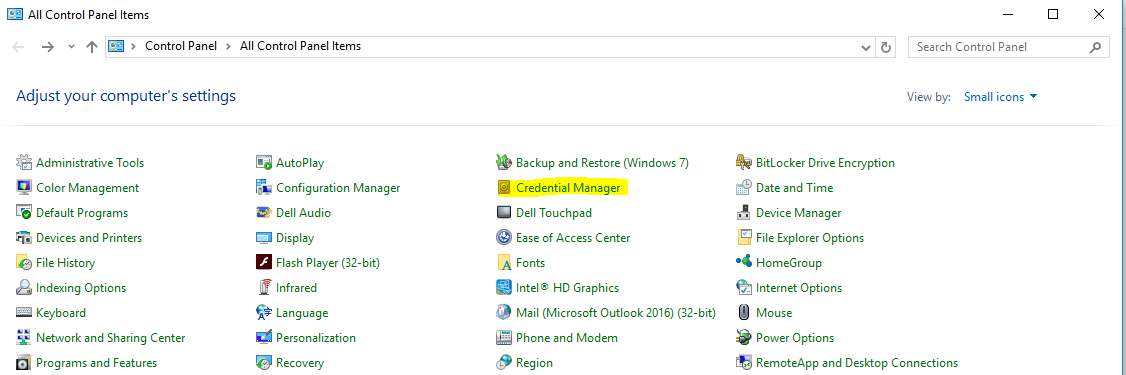
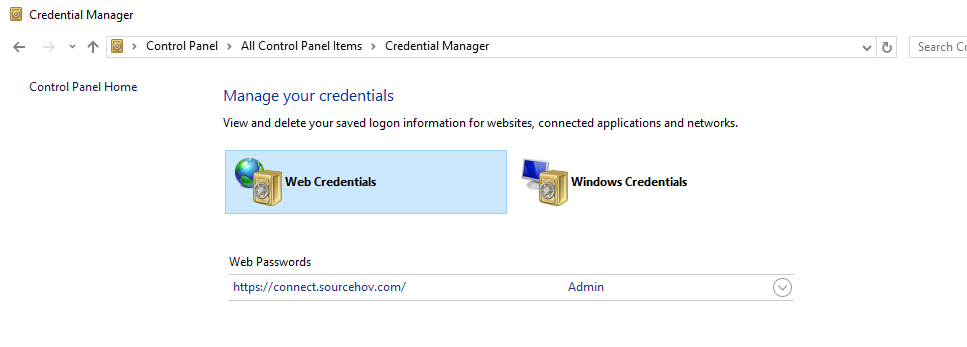
Clearing exelaonline credential through credential manager (Windows 7)
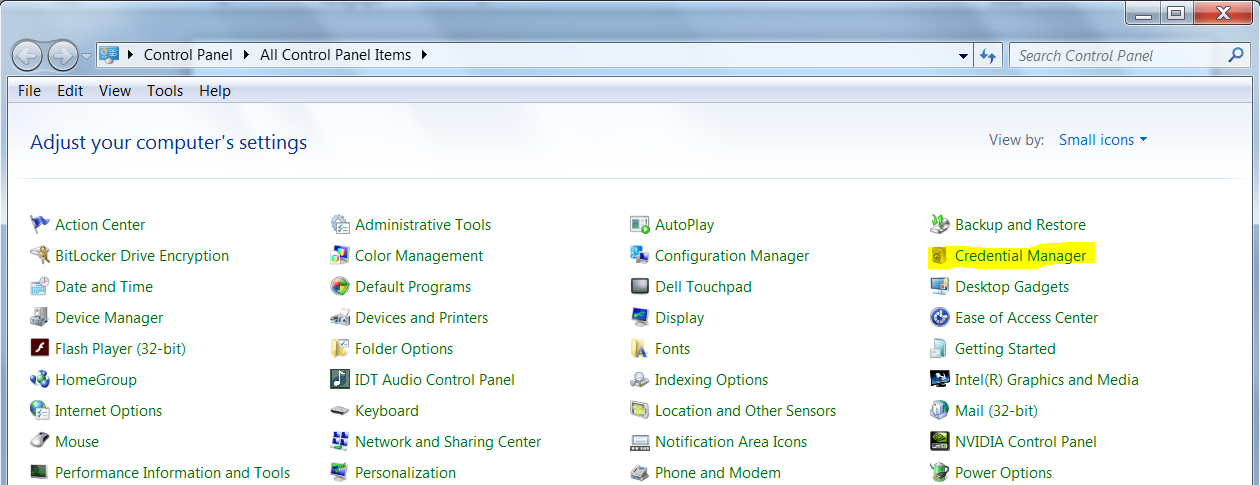
- 1. Open Control Panel
(You may have to change the View By: Small icons)
- 2. Double Click Credential Manager
- 3. Identify all EXELAONLINE credentials
- 4. One at a time click the down arrow next to each EXELAONLINE credential
- 5. Click Remove
- 6. Close Credential Manager and Control Panel by clicking on the red X in the upper right corners.

- 1. Open Control Panel
-
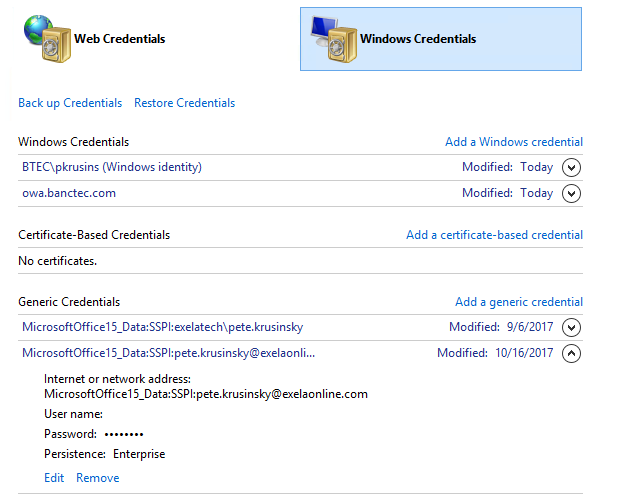
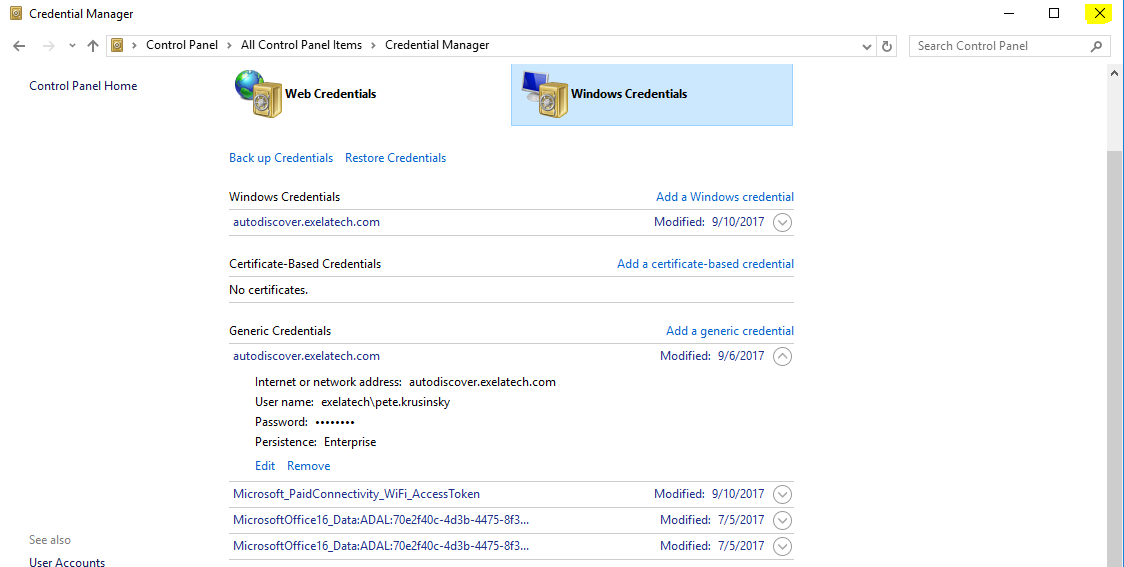
Clearing exelaonline credential through credential manager (Windows 10)
- 1. Open Control Panel
(You may have to change the View By: Small icons)

- 2. Double Click Credential Manager
- 3. By default, Web Credentials are highlighted. If there are any EXELAONLINE credentials in the list remove using
instructions on Step 5
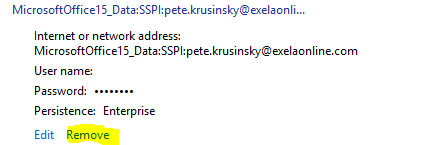
- 4. Click on Windows Credentials and identify any EXELAONLINE credentials
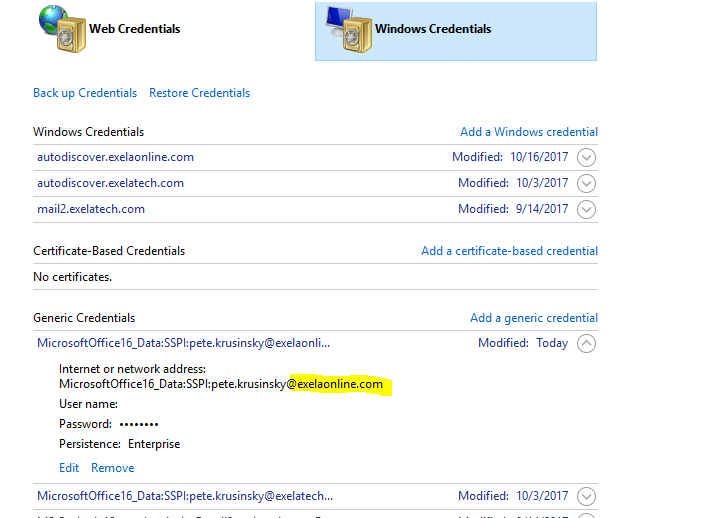
- 5. One at a time click the down arrow next to each EXELAONLINE credential
- 6. Click Remove from vault

- 7. Close Control Panel by clicking on the X in the upper right corner.
- 1. Open Control Panel
-
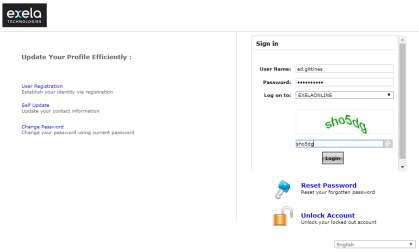
Self Service Registration
- Registering for the Exela Self Service Password Reset Tool
- 1. Open an internet browser
- 2. Navigate to https://selfservice.exelaonline.com
- 3. Enter your user name. ex. Firstname.lastname
- 4. Enter you current @exelaonline.com password
- 5. Select EXELAONLINE from the Log on to: dropdown
- 6. Enter the verification code displayed in green
- 7. Select the Login button
- 8. Select Click Here on the Welcome window

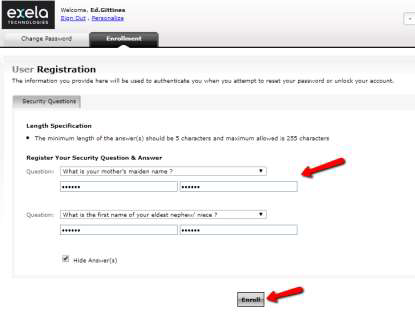
- 9. Choose your preferred security questions and enter the answers
- 10. Select the Enroll button
- 11. Congratulations! You are now registered

- 12. Bookmark the site so you can access it as needed
- 13. Select Sign out at the top of the page
-
Using Self Service
- Using the Exela Self Service Password Reset Tool
- 1. Open an internet browser
- 2. Navigate to https://selfservice.exelaonline.com
- 3. Select the Reset Password link

- 4. Enter your Exelaonline user name (firstname.lastname)
- 5. Enter the green verification code
- 6. Select the Continue button

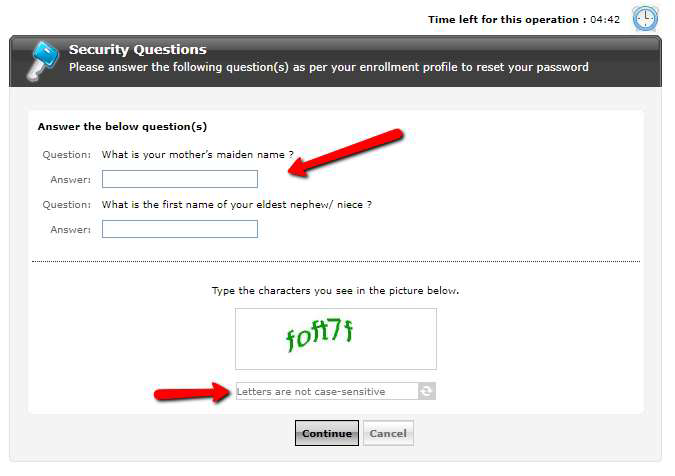
- 7. Correctly answer your security questions
- 8. Enter the green verification code
- 9. Select the Continue button
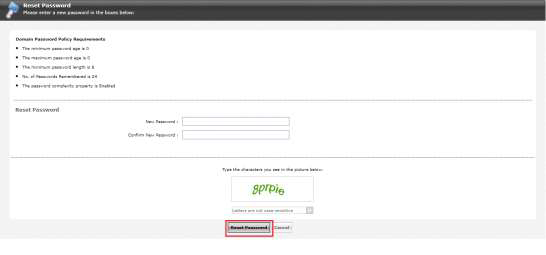
- 10. Enter your new password
- 11. Select the Reset Password button
- 12. Congratulations! Your password is reset

- 13. Select Sign out at the top of the page
MOBILE
-
Enabling exelaonline email for an Android device
- Before starting the Exchange ActiveSync configuration, you must be able to make and receive phone calls and text messages. You must also have a data plan on the phone. For questions regarding these issues, please contact the helpdesk, help.desk@exelaonline.com, 1-877-477-2748.
Also make sure GMAIL app on your phone is Updated to latest version. You can confirm this by going to "Play Store" and Type in "GMAIL" and update it.
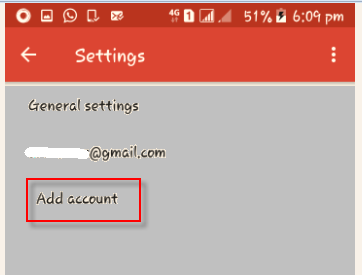
1. Open Gmail > then go to Settings


- 2. Select Add Account
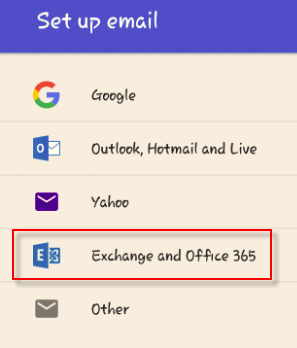
- 3. Select Exchange and Office 365
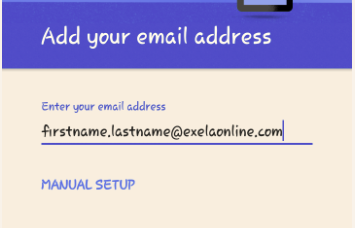
- 4. Enter your EXELAONLINE email address > then Select Manual Setup
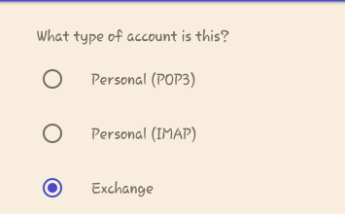
- 5. Select Exchange
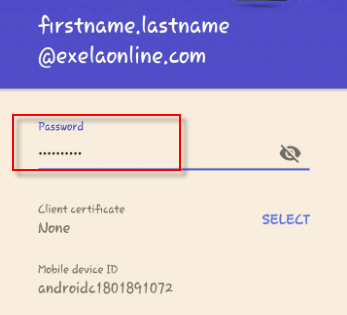
- 6. Enter your password > then Select Next
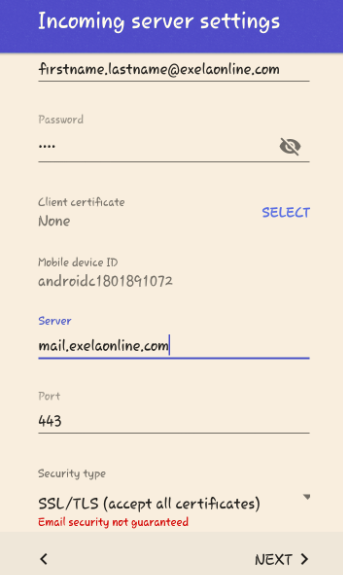
Verify Server is mail.exelaonline.com and Security Type is SSL/TLS (accept all)
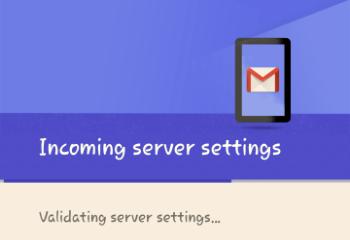
- 7. You will see it validate Incoming Server Settings
- 8. Select OK
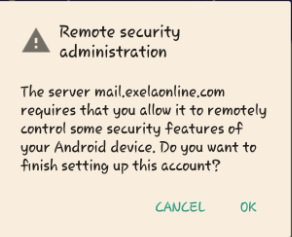
- 9. Select Validate

- 10. Select Next

- 11. You will receive the following email. When received contact the Help Desk to approve your account.

- Before starting the Exchange ActiveSync configuration, you must be able to make and receive phone calls and text messages. You must also have a data plan on the phone. For questions regarding these issues, please contact the helpdesk, help.desk@exelaonline.com, 1-877-477-2748.
-
Enabling exelaonline email for an iPhone
- Before starting the Exchange ActiveSync configuration, you must be able to make and receive phone calls and text messages. You must also have a data plan on the phone. For questions regarding these issues, please contact the helpdesk, help.desk@exelaonline.com, 1-877-477-2748.
1. Select Settings

- 2. Select Accounts & Passwords

- 3. Select Add Account
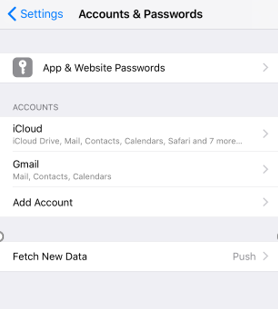
- 4. Select Exchange

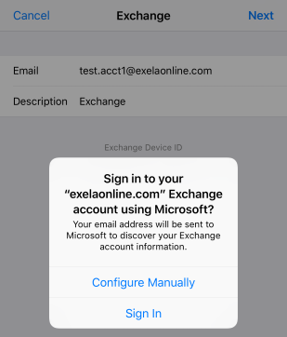
- 5. Enter your email address > then Select Next

- 6. Select Sign In
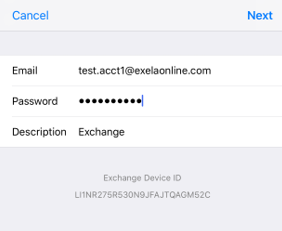
- 7. Enter your password > then Select Next
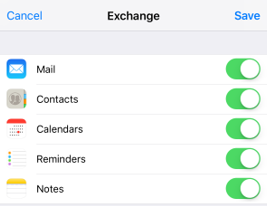
- 8. Select Save
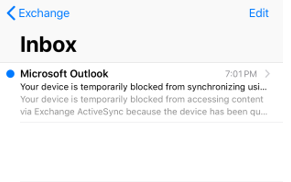
- 9. Open Mail

- 10. Open your exchange mailbox, you should see an email informing you the device is blocked. Contact an
administrator (Help Desk) to unblock your device.
- Before starting the Exchange ActiveSync configuration, you must be able to make and receive phone calls and text messages. You must also have a data plan on the phone. For questions regarding these issues, please contact the helpdesk, help.desk@exelaonline.com, 1-877-477-2748.
-
Enabling exelaonline email setup for Apple mail
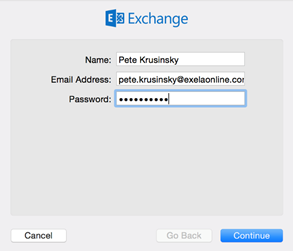
- 1. Open Apple Mail.

- 2. Select Exchange > then Select Continue

- 3. Enter your name, email address, and password > Select Continue
- 4. Select Continue if you receive this message

- 5. Select Continue
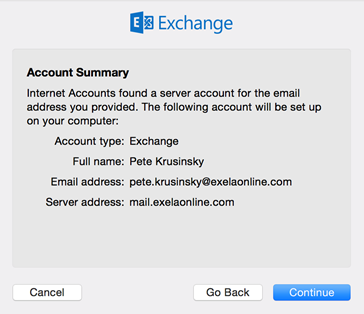
- 6. Select the options below > then Select Done to start using Mail.

- 1. Open Apple Mail.
-
Change MaaS360 Email Password for Android
- 1. Open MaaS360 > Tap Settings.

- 2. Tap Email

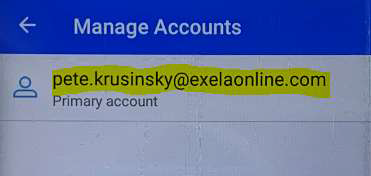
- 3. Tap Manage Accounts

- 4. Tap Your Email Address
- 5. Tap UPDATE PASSWORD

- 6. Enter your New Password > Tap SIGN IN

- 1. Open MaaS360 > Tap Settings.
-
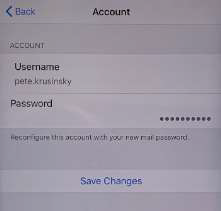
Change MaaS360 Email Password for iPhone
- 1. Open MaaS360 > Tap Settings.
- 2. Tap Mail, Contacts, Calendar, Tasks
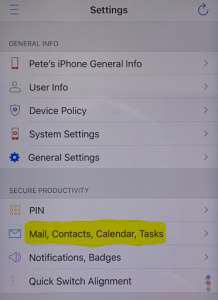
- 3. Tap Your Email Address
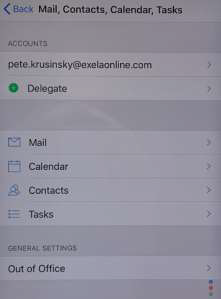
- 4. Enter your New Password > Tap Save Changes
- 1. Open MaaS360 > Tap Settings.
IMPORT
-
Importing (Backup) PST file into outlook
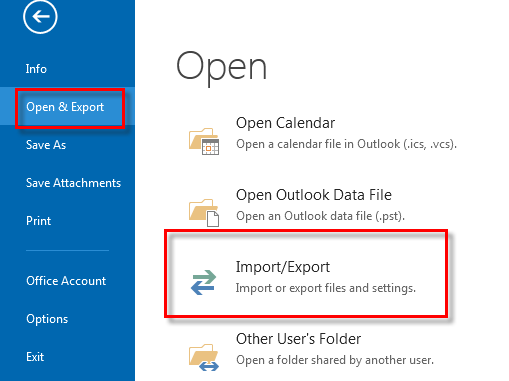
- 1. Click File
- 2. Click Open

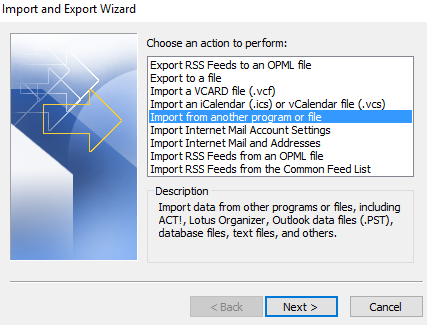
- 3. Click Import.

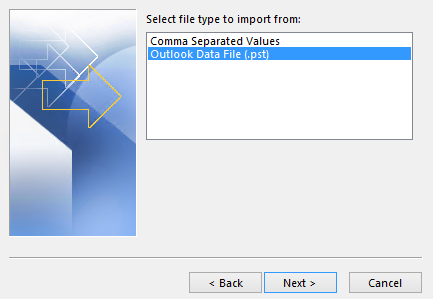
- 4. Select Import from another program or file > then Click Next
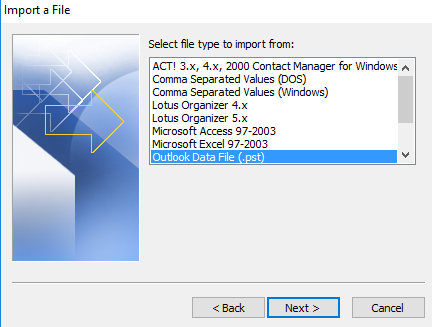
- 5. Select Outlook Data File (.pst) > then Click Next.
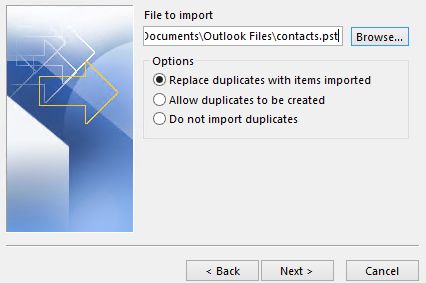
- 6. Choose Browse, then choose the .pst file you want to import, and choose Next.
NOTES:

- 7. Set the options for importing items. Choose Filter if you want to only import certain emails. Choose the More
Choices tab if you want to only import emails that are read or unread
The default settings usually don't need to be changed. The top folder -- usually Personal Folders, Outlook
Data File or your email address -- is selected automatically.
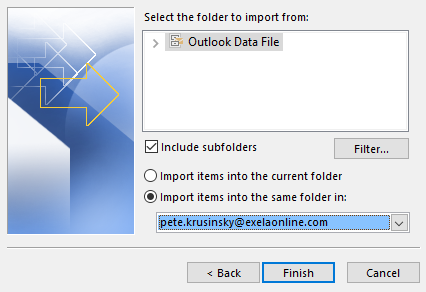
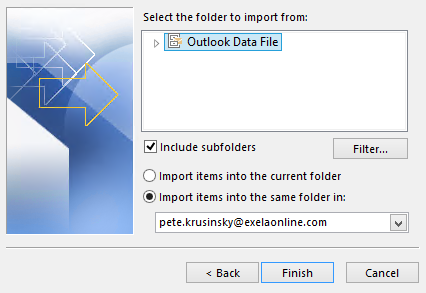
Verify the folder you are importing into. Use the drop down to select ExelaOnline email as highlighted below.

1. Include subfolders is selected by default. All folders under the folder selected will be imported.
2. Select one of the destination options:
o Import items into the current folder - this imports the data into the folder currently selected.
o Import items into the same folder in - this imports the data into the destination folder of the same
name as the source folder, e.g., from Inbox to Inbox. If a folder doesn't exist in Outlook,
it will be created.
- 1. Click File
-
Importing calendar items from a local PST file
- 1.

- 2.
- 3.
- 4. Select the PST file to which you have exported the old Calendar

- 5. On the Import Items, choose "Calendar" and "your EXELAONLINE Email address".
- 1.
-
Importing contacts from a PST file
- 1.
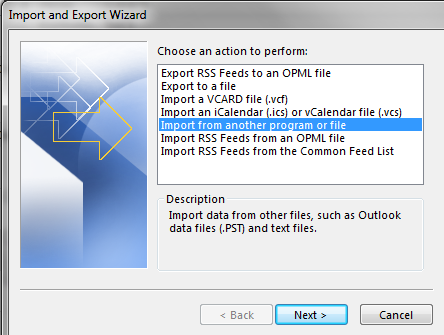
- 2. Select Import from another program or file > then Select Next
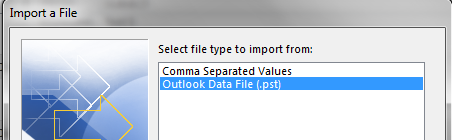
- 3. Select Outlook Data File (.pst) > then Select Next
- 4. Select the PST file of the exported Calendars > then Select Next
- 5. Select your exelaonline account in the drop down > then Select Finish
- 1.
EXPORT
-
Export old email to a PST file
- 1. Click the File tab

- 2. Click Open

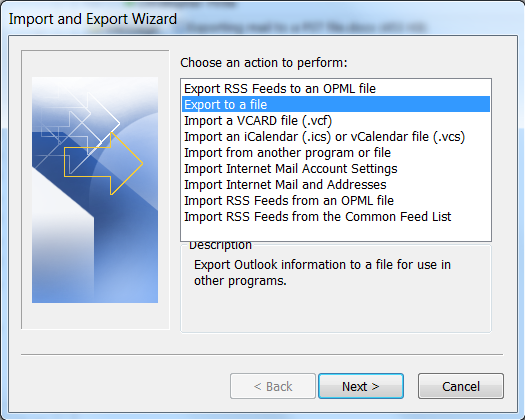
- 3. Click Import
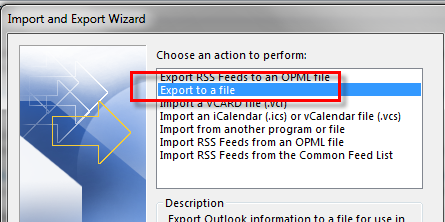
- 4. Click Export to a file > then Click Next
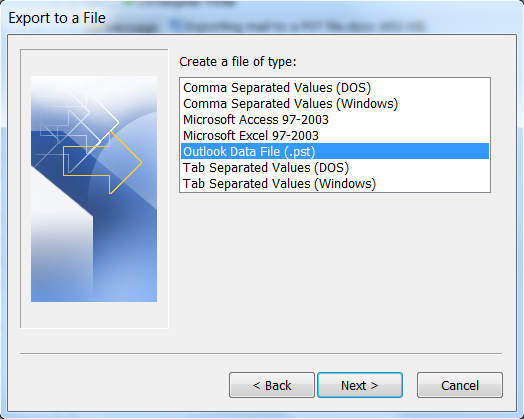
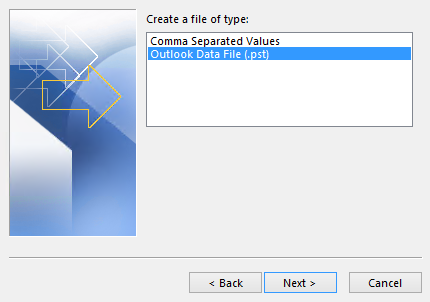
- 5. Click Outlook Data File (pst) > then Click Next
- 6. Click on your email address above the Inbox > then Click Next

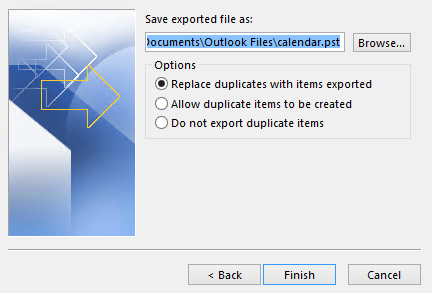
- 7. You can change the name and location of this file by clicking Browse
Click Next

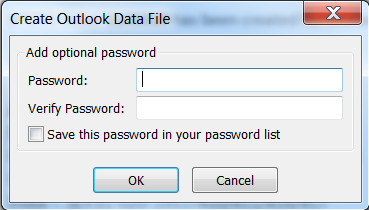
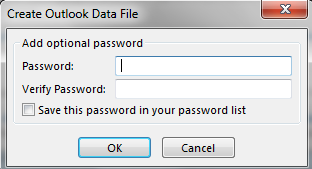
- 8. I don't recommend using a password > Click OK
Mail is exporting. Depending on the size of your mailbox this could take some time.

- 1. Click the File tab
-
Export calendar items into a local PST file
- 1.

- 2.
- 3.
- 4.

- 5. Select your Old Email Calendar that needs to be exported :

- 6.

- 7. If you want you can keep a password for this local PST file. If not, just click OK.
Export of the calendar is completed
- 1.
-
Export contacts to a local PST file
- 1.
- 2. Select Export to a file > then Select Next

- 3. Select Outlook Data File (.pst) > then Select Next
- 4. Select Calendar > then Select Next

- 5. Select Finish (you can choose another file by renaming the calendar.pst file)
- 1.
SIGNATURE
-
Email signature setup
Email Signature (Arial 10pt. font)
-
Example:Your Name, Your Title
EXELA TECHNOLOGIES, INC.
O: +1 972.821.4000 M: +1 555.555.1234
2701 E. Grauwyler Rd. | Irving, TX 76021
www.ExelaTech.com | About EXELA | EXELA LinkedIn
- Email Signature Instructions for Windows:
1. Open the email file in Word. - 2. Personalize your signature line as in example.
- 3. Highlight the signature line that you would like to use
- 4. Press CTRL + C to copy the highlighted selection to the clipboard.
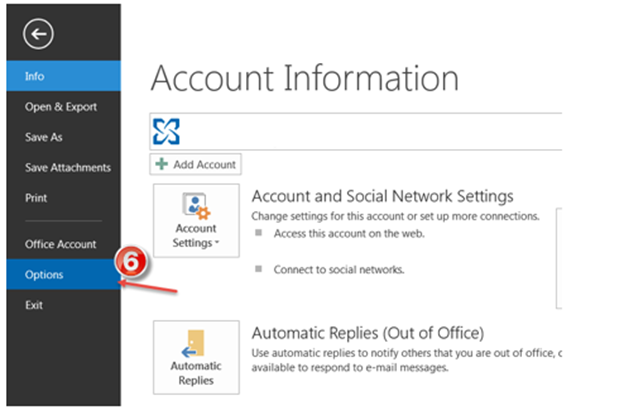
- 5. Within Outlook, click the File tab.

- 6. On the Account Information screen, click Options in the list of menu items on the left.
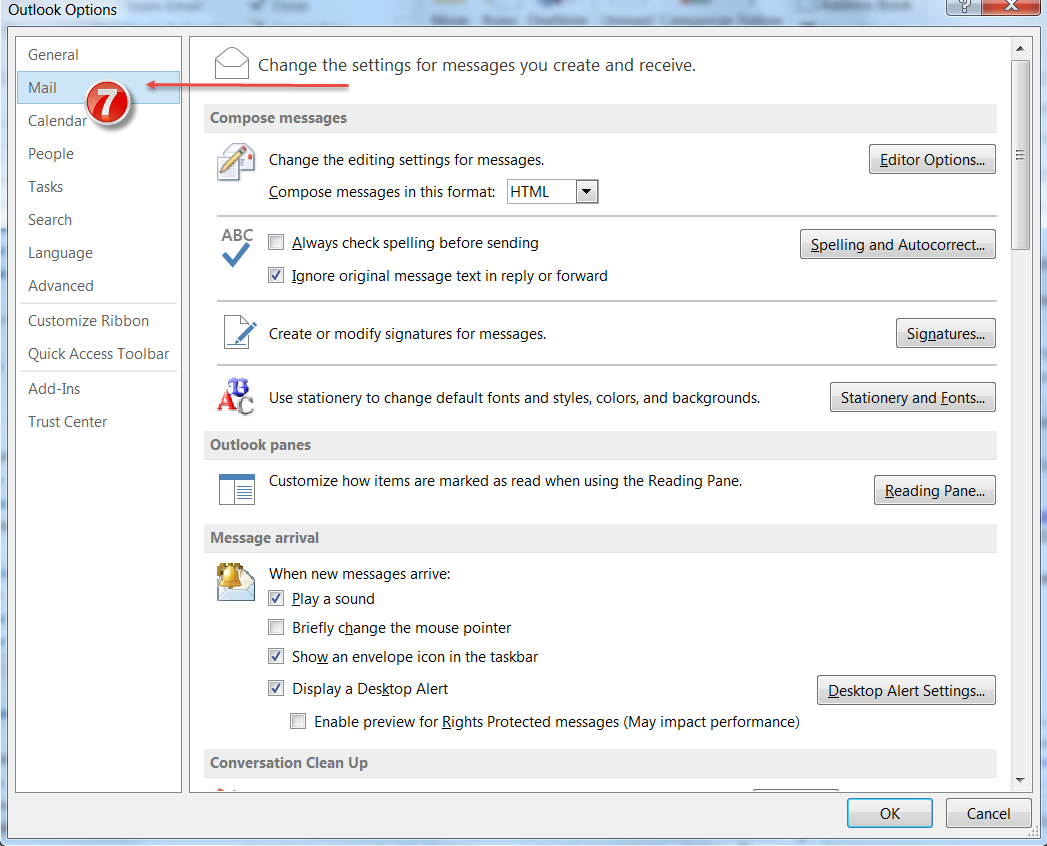
- 7. Click Mail in the list of menu items on the left side of the Outlook Options dialog box.
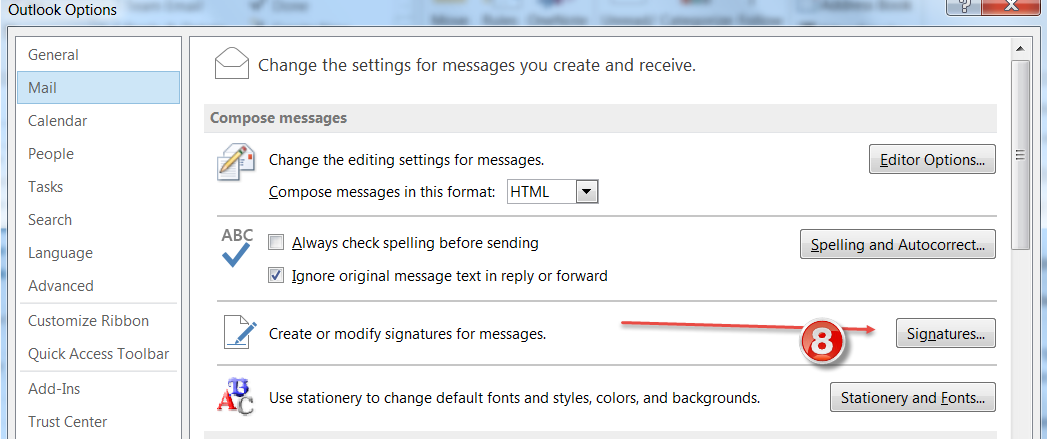
- 8. In the Outlook Options window click the Signatures button.
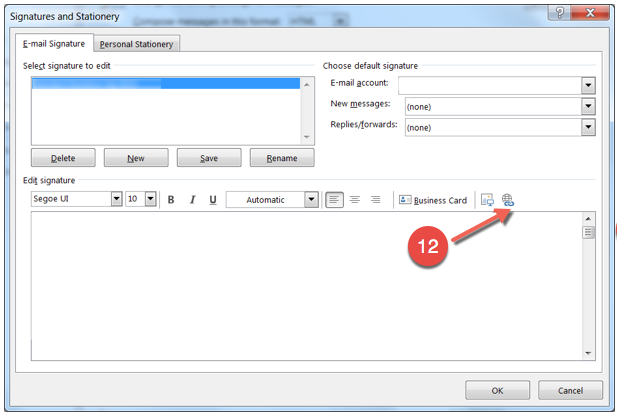
- 9. In the Signatures and Stationery window, click the New button and type a name for this standard signature.
Click OK

- 10. Click in the open space under Edit signature and paste your personalized signature.

- 11. Add in the hyperlinks for all of the linked data sources to ensure they carried over. This includes website,
about us and LinkedIn address.
- 12. In the "Text to display:" field and the "E-mail address field:" replace first.last with your own name. Don't
forget the "." between your first and last names if applicable. Click OK.
a. Be sure that the exela banner is included and hyperlinked to www.exelatech.com
b. Verify that all links work to the right location - 13. Once all edits have been made, click Save and then click OK.
- 14. If you have multiple signatures, verify that your new standard company signature is selected under the New
Messages drop down menu.
- Email Signature Instructions for Windows:
-
Clearing an email address from name cache
- 1. Click New Email
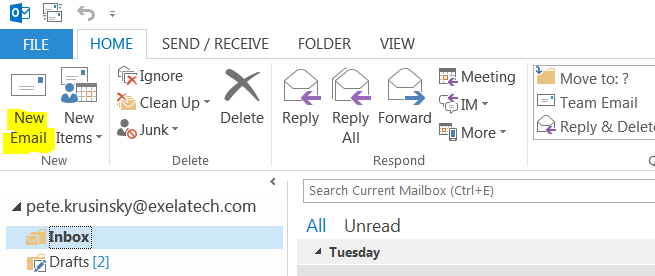
- 2. Begin typing the users name in the to field
- 3. When the name you want to remove from the list shows up - highlight and click on the X
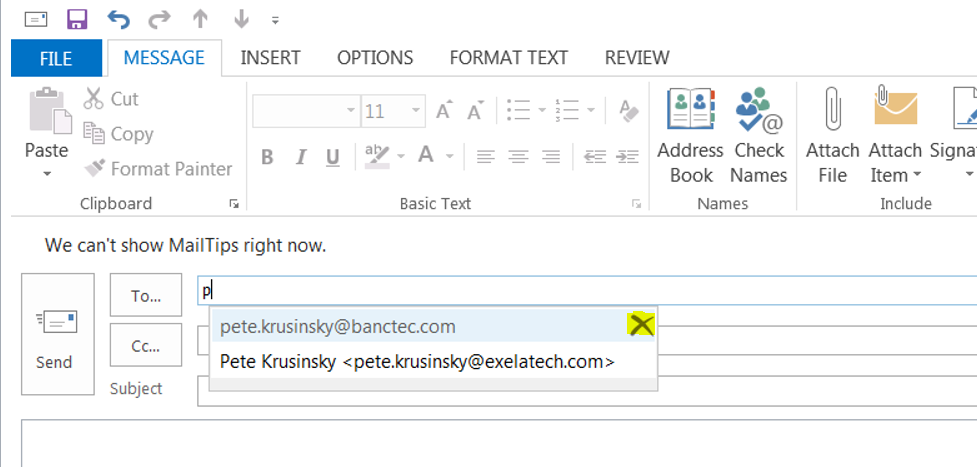
- 4. Now enter the complete email address or search for it in the Global Address List.
- 1. Click New Email
EMAIL ENCRYPTION
-
Exela Email Encryption Tool & Spam Filter-Internal User Guide
BACKGROUND
Exela has implemented enhanced email security/encryption and SPAM management settings. This document will cover how to use the spam filter, how to send encrypted email messages, and what steps clients or other authorized recipients will need to take in order to read encrypted messages from the Exelaonline email domain.
SPAM FILTER
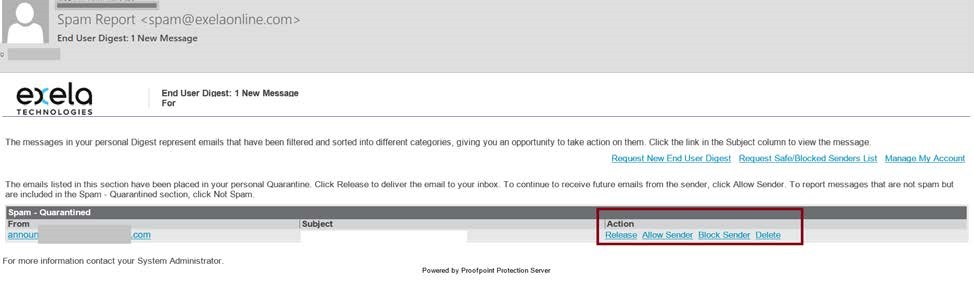
Incoming email that is flagged as spam will be sent to quarantine. To release or delete emails directly from your automated SPAM Report Email; select the "Release" option or "Delete" option under the Action menu next to the desired message:
WHAT IS ENCRYPTION
Email encryption is the process of protecting the content of email messages (containing restricted confidential or sensitive data) from being read by unintended recipients. Exela uses Proofpoint for spam management, malicious content email scanning and sensitive/restricted data email encryption; which also allows end users the ability to send encrypted email whenever necessary.
Reminder:
Restricted confidential or sensitive data includes but is not limited to PII (Personally Identifiable Information), PHI (Protected Health Information), Cardholder data/Credit card information, Human Resource Records, Company Financial information and other confidential company or client information.
PII includes name, SSN, date and place of birth, mother's maiden name, biometric records, medical records, etc.
PHI includes diagnosis information, treatment information, medical test results, and prescription information, etc.
Cardholder data includes primary account numbers (PANs)/credit card numbers, cardholder name, expiration date or service codes, etc.
Sending restricted confidential or sensitive data to outside sources without an authorization or business justified purposed is strictly prohibited. Distribution of customer information to unauthorized individuals (internal or external) is prohibited. Using non-company managed/personal e-mail programs to communicate company business is strictly prohibited.
WHAT MUST BE ENCRYPTED
Any email message containing restricted confidential or sensitive data, Personally Identifiable Information (PII), Protected Health Information (PHI), Cardholder data/Credit card numbers, Human Resource Records, Company Financial information or other confidential company or client information that is sent outside of the Exelaonline email domain must be encrypted. Any account without an "@exelaonline.com" email address is considered outside of the domain. This includes @exelatech.com.
SENDING A SECURE MESSAGE
The tool is configured to scan and automatically encrypt any email that contains content that resembles PHI, PII, Credit card number information, and Human Resource Records. When this occurs, you will receive a notice that your email message was automatically encrypted.
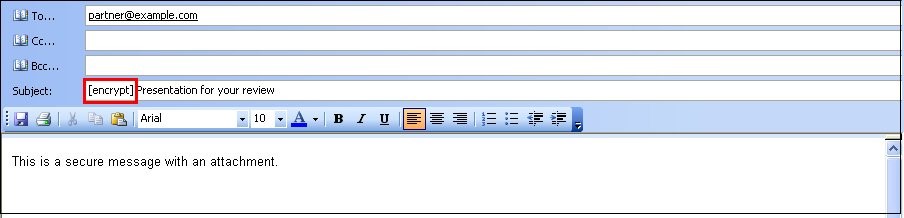
Exelaonline email domain account users have the ability to manually encrypt messages by entering the word [encrypt] into the Subject field of the message. This will encrypt the message and any attachments. Make sure you include the square [ ] brackets.
Exelaonline email domain account users will begin to see a new "Send Securely" button in Outlook. Clicking this button to send the message will encrypt the message and any attachments. Note: This is the preferred manual method for sending encrypted email messages.
After you have composed your message, click "Send Securely".
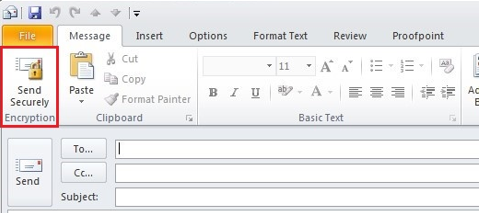
NOTE: The "Send Securely" button will be silently installed for all users and no action is required from you at this time. As a result, all Exelaonline email account holders may not receive the "Send Securely" button at the same time; entering the word [encrypt] into the Subject field of the message will still work for all users.
Email attachments that contain PII, PHI, Cardholder data/Credit card numbers, Human resource records, or other restricted confidential or sensitive data must NOT be encrypted using compressed files/WinZip, or password protected. Encrypted Compressed files/WinZip files and password protected attachments will be quarantined and you will receive a notification that your message was not successfully sent. You can still send compressed files/WinZip files if the word "[encrypt]" is added to the subject line of the message or the "Send Securely" button is used. Both of these options will encrypt the body of the message and any attachments. Outgoing email size limits are 45 MB. Please keep in mind that many recipients may have email file size limitations (i.e. 10MB), so anything over that threshold (i.e. 10MB) may possibly be blocked on the recipient's end.
The Exela SFTP site is an available secured method for securely sending sensitive or restricted confidential data (if authorized per business requirements) and must be used for outgoing files larger than 45MB.
If you send an encrypted email message containing sensitive or restricted confidential data to the wrong recipient using any of the available methods, notify the help desk immediately (help.desk@exelaonline.com).
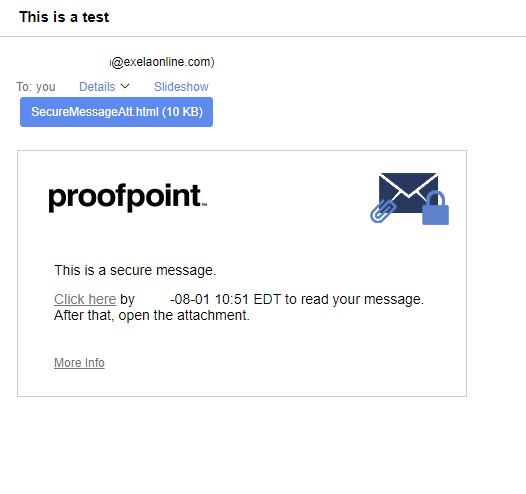
READING/DECRYPTING A SECURE MESSAGE
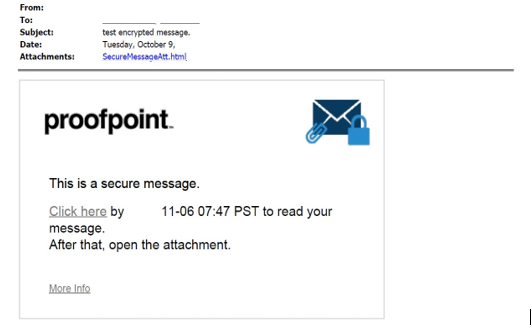
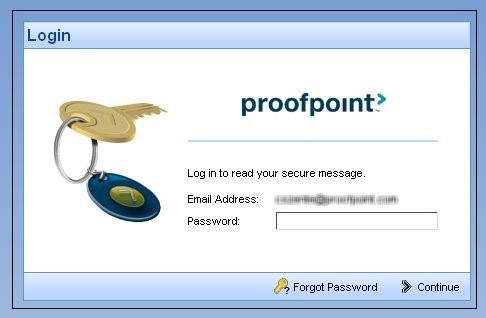
The recipient (i.e. users external to the @exelaonline email domain) will receive an email with a link and an attachment. The recipient can either select the "Click here" link or click the attachment "SecureMessageAtt.html" to launch a browser and read the received message; both options will take the recipient to a sign-in page.
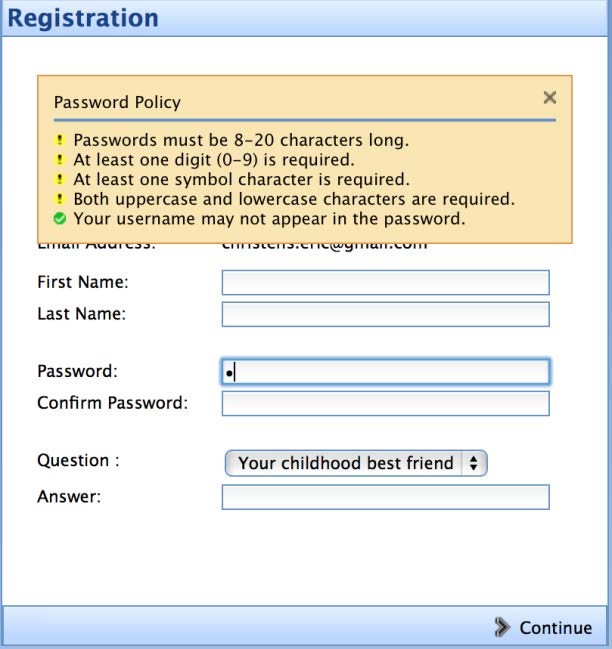
REGISTERING WITH EXELAONLINE ENCRYPTION
The first time the recipient receives a secure message, they will be prompted to create an account to register with exelaonline encryption. The recipient will need to fill in the required fields, select a security question & answer, and then click "continue". Example login options are below:
"First time here?" You'll be asked to register.
"Already registered?" You'll be asked to log in.
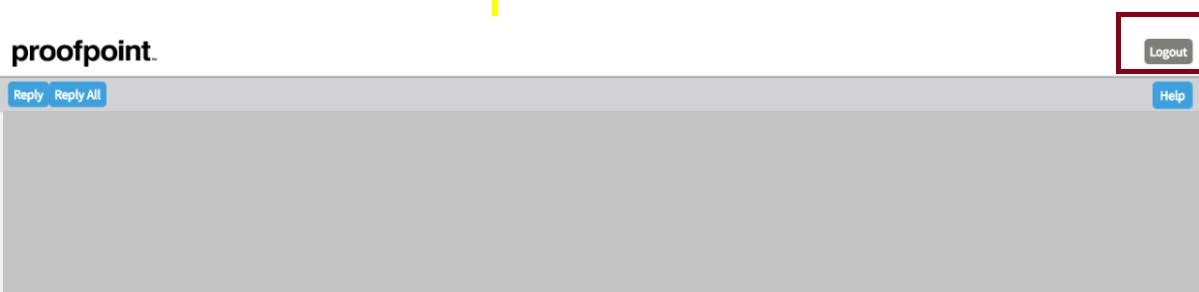
REPLYING TO A MESSAGE
"Reply" and "Reply All" options are available once the message is retrieved. If the recipient clicks "Reply", additional recipients cannot be added to the message. Clicking "Reply All" allows adding more recipients to the message. Note: Replied to and forwarded messages will remain encrypted.

ENDING THE SECURE EMAIL SESSION
The recipient will need to click "Logout" when they are done with the session.
***Note: Secure email sessions will automatically time out after 10 minutes of inactivity. Sessions will not time out during an active download. Mobile sessions do not time out; if a recipient is reading a secure message from a mobile device, they must manually log out of the session. Once the session ends, the next time the recipient wants to read a secure message, they will be prompted to log in using their password.
PASSWORD EXPIRATIONS
Exelaonline encryption passwords expire every 60 days. If the recipient's password is about to expire, they will see the message "Your password will expire in n days" displayed in a secure message. The recipient can click the link next to the expiration message to reset their password. If the recipient's password expires before they have a chance to reset it, they will be prompted to reset it the next time they read a secure message.
FORGOTTEN PASSWORDS
If a recipient forgets their password, they can click the "Forgot Password" link. They will be prompted to answer their security question and will then be able to reset their password.
ACCOUNT LOCKOUTS-AFTER TOO MANY FAILED PASSWORD ATTEMPTS
The system will lock an account after four attempts; if the recipient's account is locked, they can simply return to the login screen and click "Forgot Password".
External recipients can refer to the Exela Email Encryption Tool & Spam Filter-External User Guide for additional information.
SUPPORT REQUESTS
If you have any questions or issues, please contact the Help Desk at help.desk@exelaonline.com (Internal Exela support requests only)
-
Exela Email Encryption-External User Guide
BACKGROUND
Exela has implemented enhanced email security/encryption settings. This document will cover how users external to Exela can read encrypted-secure messages from the Exelaonline email domain.
READING A SECURE MESSAGE VIA COMPUTER
When you receive a secure message, it will look similar to this in your mailbox. Either select the "Click here" link or click the attachment "SecureMessageAtt.html" to launch a browser and read the received message; both will take you to a sign-in page.
READING A SECURE MESSAGE VIA A MOBILE DEVICE
If you open a secure message using a mobile device, select the "Click here" link instead of clicking on the html attachment. The "Click here" link is valid for two days.
Note: When using the "Click here" option, there may be up to a 60 second delay from the time Exela sends an encrypted message to when you can read the email.
REGISTERING WITH EXELA ENCRYPTION
The first time you receive a secure message, you will be prompted to create an account to register with the Exela encryption portal. Fill in the fields, select your security question and answer, and then click "Continue".
Example login options are below
"First time here?" You'll be asked to register.
"Already registered?" You'll be asked to log in.
MESSAGE OPTIONS
The "Reply" and "Reply All" options are available. If you select the "Reply" option, you cannot add more recipients to the message. Clicking "Reply All" allows you to add more recipients to the message.
Note: Replied messages will remain encrypted.
ENDING THE SECURE EMAIL SESSION
Click Logout when you are done with the session.
Secure email sessions will automatically time out after 10 minutes of inactivity. Sessions will not time out during an active download. If you are reading a secure message on your mobile device you must log out of the session. The next time you want to read a secure message, you will be prompted to log in using your password.
PASSWORD EXPIRATIONS
Your password expires every 60 days. If your password is about to expire, you will see the message "Your password will expire in n days" displayed in a secure message. Click the link next to the expiration notification message to reset your password.
If your password expires before you have a chance to reset it, you will be prompted to reset it the next time you read a secure message.
FORGOTTEN PASSWORDS
If you forget your password, click the "Forgot Password" link. You will be prompted to answer your security question and will then be able to reset your password.
ACCOUNT LOCKOUTS-AFTER FAILED PASSWORD ATTEMPTS
The system will lock you out after four attempts; if your account is locked, simply return to the login screen and click "Forgot Password".